Superimpose Studio Support
I am text block. Click edit button to change this text. Lorem ipsum dolor sit amet, consectetur adipiscing elit. Ut elit tellus, luctus nec ullamcorper mattis, pulvinar dapibus leo.
You can find a lot of useful information on how to use Superimpose Studio under the “Info” button on the top toolbar.
Here’s a great demo of Superimpose Studio on the iPhone by EatAppleNews.com
If you have just downloaded the app or have updated to the newest version, remember to reboot your device. Just like Windows and Mac OSX, rebooting is recommended after installing new software.
Many bugs are due to memory issues. You can also try uninstalling and reinstalling the app. Photography apps are very memory intensive and this should resolve it.
Green Screen Studio Support
You can find a lot of useful information on how to use Green Screen Studio under the “Info” button on the top toolbar.Here’s a great demo of Green Screen Studio on the iPhone by EatAppleNews.com
Here’s a great demo of Green Screen Studio on Mac OSX by EatAppleNews.com
If your image is having trouble getting all of the green screen removed using the Auto Green Screen button, check your green screen. Any blemishes or shadows may affect the green screen technology from properly identifying the green screen.
The biggest challenge when setting up a green screen is even lighting and the avoidance of shadow, because it is best to have as narrow a color range as possible being replaced. A shadow would present itself as a darker color to the camera and might not register for replacement.
Please try rebooting your device, as many bugs are due to memory issues. You can also try uninstalling and reinstalling the app. Photography apps are very memory intensive and this will usually resolve it.
If you have just downloaded the app or have updated to the newest version, remember to reboot your device. Just like Windows and Mac OSX, rebooting is recommended after installing new software.
Many bugs are due to memory issues. You can also try uninstalling and reinstalling the app. Photography apps are very memory intensive and this should resolve it.
Duplicate Photo Cleaner Support
User Guide
Congratulations on downloading Duplicate Photo Cleaner, the #1 fastest duplicate photo scanning algorithm on the Mac App Store.
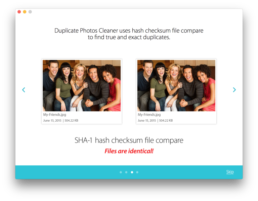
We use a true SHA-1 checksum file compare to ACCURATELY find legitimate duplicates. This means that it finds all duplicate photos by looking at the actual HASH value. So if the contents of the file are changed in anyway, then it is no longer a legitimate duplicate since the hash values are different. Duplicate Photo Cleaner does not remove similar photos. Only TRUE and EXACT duplicates with the same hash value. Renaming a file does not change the file contents, so Duplicate File Cleaner will still find all duplicates even if they are named differently.
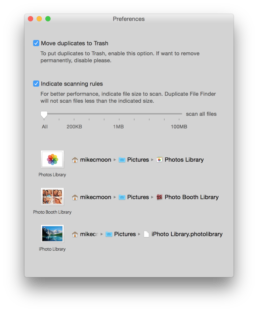
From here you can edit/change the location of your libraries. You can also choose to automatically move deleted files to the trash or to permanently delete them automatically.
We suggest “Move duplicates to Trash” just in case you accidently remove duplicates you might want to recover.
You’ll also see scanning rules which allow you to only scan photo files larger than a certain file size. This is useful if you’re only removing duplicate photos to free up more disk space and don’t want to bother with smaller photo sizes.
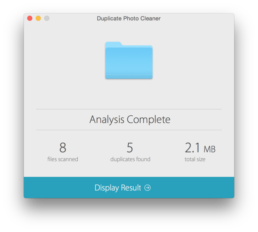
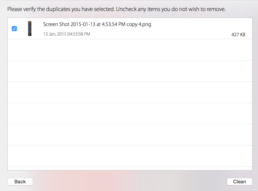
Click “Auto Select All” to automagically select all duplicate photos and keep the original photo. You will be able to see thumbnails of every duplicate photo and the metadata. You can see the file name up top and the file location on the bottom. Click the “eye” icon on the bottom to reveal the location in Finder to see the files.
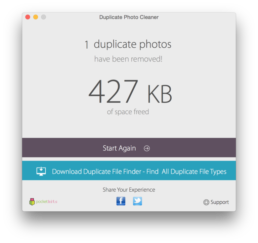
Click “Clean Selected Files” to remove all of your duplicate photos. You will get one more confirmation screen to make sure the selected files are the files that you want to delete.
That’s it! You’ve successfully removed your duplicate photos! Congratulations! 🙂
Hope you found this guide useful. Let us know down below. Email us at support@pocketbitsllc.com with any comments, bugs, or suggestions. We’d love to hear from you! Your love and support helps us update our apps to continue bringing you the very best of apps. Thank you!
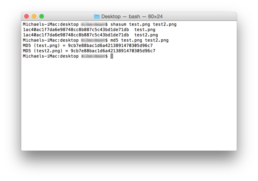
Once in termal you can type the syntax:
shasum /path/to/file
To verify a file named “test.png” and “test2.png” in the current folder we’re in, it would be:
shasum test.png test2.png
That long hexadecimal string is the SHA1 hash.
Similarly for MD5, you can type the same syntax:
md5 /path/to/file
To verify a file named “test.png” and “test2.png” in the current folder we’re in, it would be:
md5 test.png test2.png
In the above screenshot you can also see the MD5 example.
For more details on checking your hash, you can visit the following links.
http://osxdaily.com/2012/02/05/check-sha1-checksum-in-mac-os-x/
Please remember to close Photos/iPhoto applications when scanning. Run the scanner after you close the applications and it should work. 🙂
If you are on a network drive or external drive, files can only be permanently deleted because they do not have “.trash”. Remember to set settings to permanently delete under preferences/settings in the app for these drives.
Warning: They will be permanently deleted and NOT recoverable.
Duplicate Photo Cleaner uses a true SHA-1 checksum file compare to ACCURATELY find legitimate duplicates. This basically means that it finds all TRUE duplicate files by looking at the actual HASH value. Renaming a file with a different name doesn’t change this. Similar photos are not exact duplicates and do not have the same hash value.
If the photo contents are altered, then it is no longer a legitimate duplicate and Duplicate Photo Cleaner will not flag it as a duplicate.
If it is not detecting your images as duplicates, then they are not TRUE duplicates. They were altered. Duplicate Photo Cleaner only finds all legitimate duplicate files.
You can check your SHA-1 and MD5 hash checksums to see if they are true duplicates by following the guide in this article:
Color Accent Studio Pro
Color Accent Studio Pro
Add a touch of color to your photos
- Add a touch of color for dramatic effect.
- Paint color to black and white photos.
- Add custom colors to your photos.
Green Screen Studio Pro
Green Screen Studio Pro
Chromakey Green Screen on Mac
- Chromakey algorithm replaces your green screen with any background
- Manual tools for editing images with no green screen
- Featured on Macworld, EatAppleNews, and many more!
Superimpose Studio Pro
Superimpose Studio Pro
Combine any photo
- Superimpose your photos!
- Combine photos into professional quality photomontages
- Featured on EatAppNews, BrotherSoft, and many more!
Duplicate Photo Cleaner
Duplicate Photos Cleaner
Find and Clean Your Duplicate Photos
- #1 Fastest duplicate scanning algorithm on the Mac App Store!
- True SHA-1 checksum file compare for pinpoint accuracy.
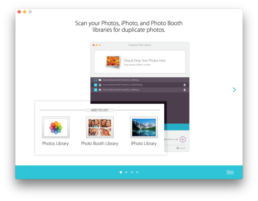
- Also scans Photos, iPhoto, and Photo Booth libraries for duplicates!


